Here are some photos I promised! Wishing all a Merry Merry twelve days of Christmas! (I'm just saying it because I'm late for an actual Christmas greeting)

27 December 2007
Paris!
Here are some photos I promised! Wishing all a Merry Merry twelve days of Christmas! (I'm just saying it because I'm late for an actual Christmas greeting)
21 December 2007
Touch Down!

And yes I'm back! Almost 2 days ago to be exact. But well, it's the festive period and parties and gatherings are all coming up so it might be a while more till I have time to post. But I'll get some pictures of my trip up soon! I promise!
03 December 2007
Short and Sweet
And so this post shall be. Alright, maybe not so much of sweet, but short at least.
After an extra long hiatus, ugly biscuits and forgetting my blog's birthday, I'm going to leave you guys (and my blog) once again as I take a long awaited trip! So, I'll be setting off tomorrow on a tour to Europe with my family. We'll be visiting Paris, Pisa, Rome, Venice, Lucerne, Innsbruck and Brussels, to name a few. I'm excited about the weather, the shopping, the scenery, the food, the souvenirs, basically everything!
I'll be gone for 16 days so I'll be in time for Christmas. Which will kick start another busy festive period with all the present-making, baking and Christmas shopping and partying. Hopefully I'll be able to squeeze in a post or two before the end of the year!
Till then, have a happy December!
28 November 2007
The Forgotten and The Not...
Have you ever forgotten a close friend's birthday? Or didn't even bothered remembering in the first place? How about forgetting your own birthday? Hrm...
Well, because I just realised my blog's birthday was 2 months ago. Not that I find it particularly important, but when Bea posted about her blog turning two, it dawned on me that I started my blog around this time last year. I checked and realised it was in October. And to be exact, 2 October. Okay okay, so my judgment's a bit off. But it's no big deal, there's always a next time!
So this post isn't just about forgotten birthdays and anniversaries. It's also about celebration! My abstract representation of cha-soba noodles actually brought me 3rd place for best capture in Click! And if I had wanted a belated birthday celebration for my blog, I think there's nothing better than a recognition of the photography I do for this blog.
Big thank you to Jai and Bee of Jugalbandi and the judges for this pleasant "birthday present". If you'd like to view the other winners, head over to Jugalbandi and take a look at the amazing entries!
Fireworks for the celebration!
20 November 2007
Click!
When I first heard about Click!, I was really kinda excited. And why wouldn't I? Photographing food that I make/eat makes up half of what I do to keep this blog and photo events just makes it more fun. Of course there's DMBLGiT but the more the merrier right?
Well I really really wanted to participate in the first edition but I was up to my neck in school work and didn't have time to photograph any eggs. Now that the holidays are here, and I'm free from school, I wouldn't miss this month's edition for anything.
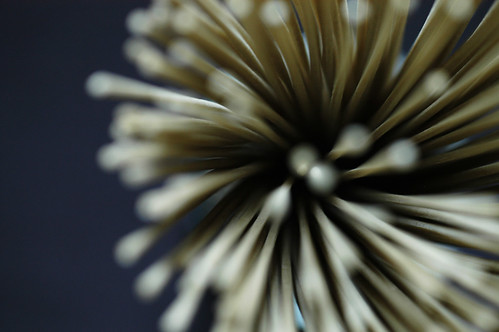
Nudel. Noodles. 面.
Although I'm not a carbo freak, I do like eating noodles. Pasta, mung bean noodles, soba, udon... the list goes on. So the choices as to what to photograph were many. I have had my packet of cha-soba from Daiso for quite some time and haven't had the chance to cook it. And it came in handy for this month's contest.
I took a whole series of photographs of soba but wasn't very happy until the last few shots. Because the bundle of soba is just as such, it got quite boring lying them flat on the working surface, which was a stool with a cardboard on top (to enlarge working area), covered with a black fabric that I bought for my fashion design assignments. Even when I tried to arrange the soba unevenly, it just looked to me like a broom that we used in the kampung.
So I had seen Ilva photograph her squid ink pasta (for some reason, I can't seem to find that photograph!) and decided to use the way she composed her picture. So I stuck the bundle into a glass and let the bundle open up slightly and photograph from top down. And I liked it! I liked how it opens up like a flower or like fireworks, just not as colourful. I like going up really close and playing with DOF. So I ended up with quite an abstract shot, I must say. Which really worked for me. I wanted to go with something that doesn't say noodles outright. It might not work for everyone but hey, art is quite subjective isn't it?
Some details of the photograph
Camera: Nikon D100
Lens: Nikkor 70 - 180mm
Exposure: 0.02sec (1/50)
Aperture: f/4.5
Focal Length: 70mm
**Handheld with natural light from window 0.5m above and behind the set up.

Well I really really wanted to participate in the first edition but I was up to my neck in school work and didn't have time to photograph any eggs. Now that the holidays are here, and I'm free from school, I wouldn't miss this month's edition for anything.
Nudel. Noodles. 面.
Although I'm not a carbo freak, I do like eating noodles. Pasta, mung bean noodles, soba, udon... the list goes on. So the choices as to what to photograph were many. I have had my packet of cha-soba from Daiso for quite some time and haven't had the chance to cook it. And it came in handy for this month's contest.
I took a whole series of photographs of soba but wasn't very happy until the last few shots. Because the bundle of soba is just as such, it got quite boring lying them flat on the working surface, which was a stool with a cardboard on top (to enlarge working area), covered with a black fabric that I bought for my fashion design assignments. Even when I tried to arrange the soba unevenly, it just looked to me like a broom that we used in the kampung.
So I had seen Ilva photograph her squid ink pasta (for some reason, I can't seem to find that photograph!) and decided to use the way she composed her picture. So I stuck the bundle into a glass and let the bundle open up slightly and photograph from top down. And I liked it! I liked how it opens up like a flower or like fireworks, just not as colourful. I like going up really close and playing with DOF. So I ended up with quite an abstract shot, I must say. Which really worked for me. I wanted to go with something that doesn't say noodles outright. It might not work for everyone but hey, art is quite subjective isn't it?
Some details of the photograph
Camera: Nikon D100
Lens: Nikkor 70 - 180mm
Exposure: 0.02sec (1/50)
Aperture: f/4.5
Focal Length: 70mm
**Handheld with natural light from window 0.5m above and behind the set up.
So what if they're ugly?
I think we'd all want to think that looks don't matter, but ultimately, we all know they do. In fashion school, it's almost everything that people care about. Especially with a lecturer who can't seem to stop pointing out who's putting on weight. And when I was eating at a certain local Western food chain, I realised it just wasn't the same without a menu with pretty pictures. I need pretty pictures to tell me what to eat! But when I went to the website of that certain local Western food chain, I thought it might be for the best for the menu to not have any photographs.
So, what got me into this good looking VS bad looking talk? Well, meringues. Yeah, those that you get from baking whipped egg whites and sugar.
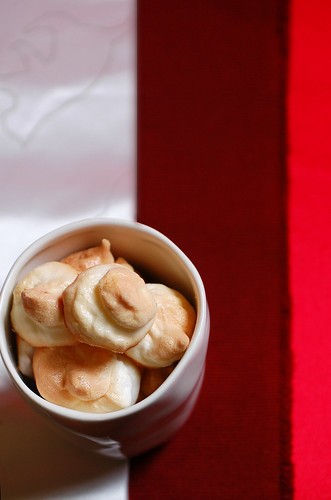
I had leftover egg whites from baking the lavender shortbread and decided to make some meringues out of them. I always had the impression that meringues were difficult to make so it was only then did I decide to take my first step into the realm of meringue making. And it wasn't hard. I just erm, needed to not be too hasty. I remembered seeing a recipe for meringues that Brilynn had put up and went back to look for it.
Now this is where it started going a little haywire. No, Brilynn's recipe was fine. Great actually. It was me. I swear next time I will read recipes again and again until I can memorise them before proceeding. And I swear I would never underestimate 4 egg whites. Because you see, my oven is small. Like puny, small. I never expected 4 egg whites to grow into that much meringue! And my baking sheet wouldn't fit half the piped meringues. Whipped egg whites can't sit and I was in such a haste to well, use up my egg whites that I tried speeding up the baking process by turning up the heat and forgot the last part of the recipe: leave in oven after baking for another hour. Oops.
Now after all these talk, where does the ugly part come in? Like right here. Now. So meringues obviously have to have some time in the oven at a fairly low temperature for them to bake well. And my rushing things wasn't going to give me nice meringues. The first batch browned too quickly. And didn't set. So they were kind of squishy, much less say photogenic. I had to destroy that evidence! Okay let's have the second batch then. By then I realised I wasn't going to get to use up all that meringue. To cut losses, I concentrated on that batch and did *almost* what the recipe said. But the meringues were still too brown. Amateur piping skills didn't help make my meringues any more attractive.
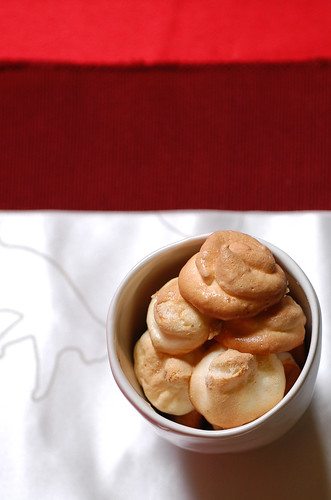
And guess what my sister called them. Ugly biscuits. Yeah. Thanks. And it turned out that shooting ugly biscuits made them uglier. The humidity in Singapore just wouldn't spare these poor little meringues alone. They got tacky and stuck to each other, disfiguring themselves in the process. Sigh. But! Big BUT. They were tasty. And that's what counts, right?
Because it was so long ago and I can't remember what I did to create my meringue concoction, please head down to Jumbo Empanadas and try out the meringue recipe. Even though mine didn't turn out all that great, they were slightly crisp on the outside and dissolved away in the mouth. Almost like how candy floss would. Leaving a fresh, lemony flavour lingering on the tongue. I bet yours would be better if you followed the recipe well.
Oh, and please use an electric mixer. I can't imagine you whipping the egg whites manually like my friend's boyfriend.

So, what got me into this good looking VS bad looking talk? Well, meringues. Yeah, those that you get from baking whipped egg whites and sugar.
I had leftover egg whites from baking the lavender shortbread and decided to make some meringues out of them. I always had the impression that meringues were difficult to make so it was only then did I decide to take my first step into the realm of meringue making. And it wasn't hard. I just erm, needed to not be too hasty. I remembered seeing a recipe for meringues that Brilynn had put up and went back to look for it.
Now this is where it started going a little haywire. No, Brilynn's recipe was fine. Great actually. It was me. I swear next time I will read recipes again and again until I can memorise them before proceeding. And I swear I would never underestimate 4 egg whites. Because you see, my oven is small. Like puny, small. I never expected 4 egg whites to grow into that much meringue! And my baking sheet wouldn't fit half the piped meringues. Whipped egg whites can't sit and I was in such a haste to well, use up my egg whites that I tried speeding up the baking process by turning up the heat and forgot the last part of the recipe: leave in oven after baking for another hour. Oops.
Now after all these talk, where does the ugly part come in? Like right here. Now. So meringues obviously have to have some time in the oven at a fairly low temperature for them to bake well. And my rushing things wasn't going to give me nice meringues. The first batch browned too quickly. And didn't set. So they were kind of squishy, much less say photogenic. I had to destroy that evidence! Okay let's have the second batch then. By then I realised I wasn't going to get to use up all that meringue. To cut losses, I concentrated on that batch and did *almost* what the recipe said. But the meringues were still too brown. Amateur piping skills didn't help make my meringues any more attractive.
And guess what my sister called them. Ugly biscuits. Yeah. Thanks. And it turned out that shooting ugly biscuits made them uglier. The humidity in Singapore just wouldn't spare these poor little meringues alone. They got tacky and stuck to each other, disfiguring themselves in the process. Sigh. But! Big BUT. They were tasty. And that's what counts, right?
Because it was so long ago and I can't remember what I did to create my meringue concoction, please head down to Jumbo Empanadas and try out the meringue recipe. Even though mine didn't turn out all that great, they were slightly crisp on the outside and dissolved away in the mouth. Almost like how candy floss would. Leaving a fresh, lemony flavour lingering on the tongue. I bet yours would be better if you followed the recipe well.
Oh, and please use an electric mixer. I can't imagine you whipping the egg whites manually like my friend's boyfriend.
19 November 2007

13 November 2007
Oopsie!

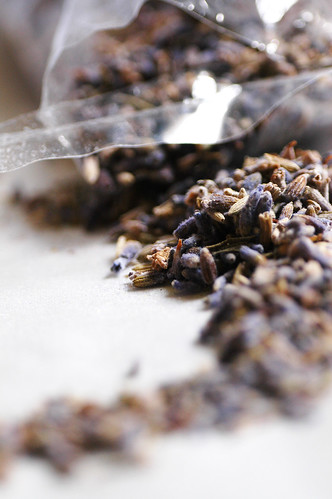
It's November already! And about time I posted about my lavender shortbread! I know, I know, certain few (you know who you are) have been waiting ever since I posted the photos up on Flickr a month ago. I'm really sorry! School's been busy like hell giving me no time to eat and sleep on most days much less *think* about blogging. Now that everything is finally over and I have a long break from now up to the new year, I've got lots of time to cook, blog, photograph and most of all enjoy myself. Now that's worth celebrating!

So... back to the cookies. I've previously cooked with roses and it was delightful. I love how instead of just the sense of smell, each mouthful treats you to the lovely taste and scent of rosebuds: pleasantly sweet. So when I first saw lavender cookies, I knew, somehow, that I had to get my hands on to baking them. Lavender in cookies, isn't that just plain ingenious? I've always been intrigued by cooking with flowers and cooking with lavender isn't something that I would pass on.

The first lavender cookies I encountered were these babies from Milk and Cookies. That got me itching to get some dried lavender, but as the obvious procrastinator would, I procrastinated. Then, these came. Now I really have to go get that pack of lavender!
And I'm awfully glad I did. Refreshing and slightly tangy, these lavender shortbread cookies were a breath of fresh air. Sugar-coated buttery goodness. Mm~
To be honest, when I was preparing the cookie dough, I was a little apprehensive of the amount of lavender to put in. I can't really remember if I added 3/4 of a tablespoon or less, but I remember being extra hesitant about it. It was after all my first time adding lavender to food and although I wanted to be able to taste lavender in every mouthful of cookies, I didn't want to be overwhelmed by it all. When the cookie dough didn't smell or lavender at all, I started wondering if it was too little. But cookie dough(s) deceive! Once the cut cookies hit the oven, the beautiful scent of lavender filled the house. The aroma toned down once the cookies cooled, but one bite and there's no doubt about it. My sister took one cookie without any knowledge of what was in it and immediately said, "Tastes like lavender!" And everytime I open the cookie jar, I would be greeted by the smell of sweet sweet lavender. Each cookie is like a sprig of lavender flowers. So, what's not to love about these cookies?

Lavender Shortbread Cookies
Ingredients
80g icing sugar
3/4 - 1 tbsp dried lavender
140g unsalted butter, cubed
1 tsp lemon zest
210g plain flour
3 large egg yolks
Granulated sugar (for coating)
- Preheat the oven to 180°C.
- Whisk icing sugar and lavender together in a bowl.
- Add butter, lemon zest and lavender/sugar mixture to the bowl of an electric mixer and mix until smooth and light in colour.
- Add flour and mix until well combined.
- Add egg yolks and mix just until the eggs are fully incorporated and the dough comes together.
- Form a disk from the dough, wrap with plastic wrap and refrigerate until firm (about 30mins).
- Roll the dough out between 2 layers of plastic wrap to 1.5cm thickness and cut cookies out with a cookie cutter.
- Toss each cookie in a bowl of granulated sugar to coat.
- Place the sugar-coated cookies on a lined baking tray and bake till lightly golden (12 - 15mins).
P.S.: I thought the eggs I had at home were small and used 4 egg yolks instead of 3. Apparently, the were sufficiently big and I got a less crumbly texture from the cookies as the dough was moister.
P.P.S.: Handle the cookie dough as little as possible and each time after I cut enough cookies for one batch, I'll chill the remaining cookie dough again so that it's easier to work with. Also dusting the cookie cutter with flour before each cut helps to remove cookies from the cutter.

P.P.P.S: Ain't those little noodle boxes cute?! I'm working on it as a gift idea for Christmas!
21 October 2007
29 September 2007
When Time Isn't On Your Side...
You make sandwiches!
Alright, that's not exactly what you should be doing when you've got no time on your hands and lecturers are hounding you for your assignments. When that happens, you simply forgo sleep and lunch to fulfil your duties as a student. Sandwich-making should be the last thing on your mind.
BUT! If you know me enough, it just doesn't make sense to not whip up something to eat when you're at home with a refrigerator full of ingredients to use! So for the 2 days when I stayed at home, barely sleeping 3 hours a day, I ate sandwiches for lunch. Very good sandwiches.
Another reason for not using a recipe is just simply because you might not like mine. I like to spread mustard and sweet chilli sauce on my bread before layering on the sandwich filling. You might not like that mustard and chilli combination. I always try to have some kind of "plant material" like tomatoes, lettuce, cucumbers and/or onions in my sandwich. You might not like tomatoes. Or lettuce. Or cucumbers. Or you just don't like vegetables altogether. Which makes you like my sister and previous Biology lecturer and not very healthy.
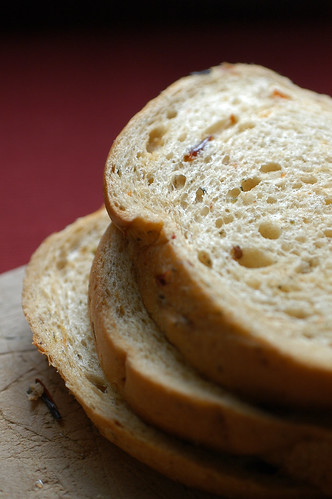
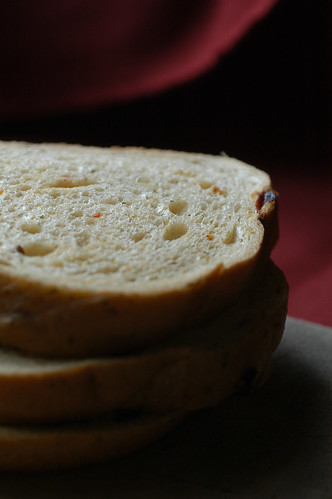
So, it makes things easy, just focus on getting the best ingredients. I'm not one for white bread. Like white, white bread. If I had any choice, I would get bread that has something, anything, that makes it not white. And I like crusty, chewy bread. My favourite bread to go to currently is the Savoury Delight Loaf from Gardenia. But, it seems like it isn't available now. Maybe because Bonjour has one that's exactly the same, just in a different shape and not as chewy. But the addition of sun-dried tomatoes and herbs makes it really good. Even if eaten on its own.
Well, maybe you should start your own sandwich-making session now. I think I might have ran out of things to say about my sandwiches.
Alright, that's not exactly what you should be doing when you've got no time on your hands and lecturers are hounding you for your assignments. When that happens, you simply forgo sleep and lunch to fulfil your duties as a student. Sandwich-making should be the last thing on your mind.
BUT! If you know me enough, it just doesn't make sense to not whip up something to eat when you're at home with a refrigerator full of ingredients to use! So for the 2 days when I stayed at home, barely sleeping 3 hours a day, I ate sandwiches for lunch. Very good sandwiches.
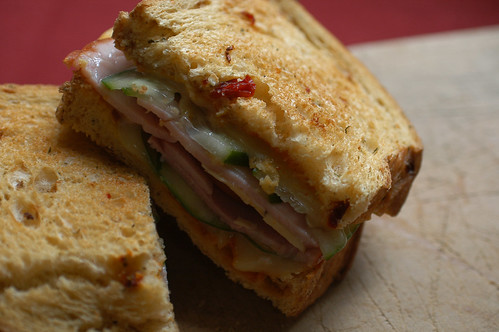
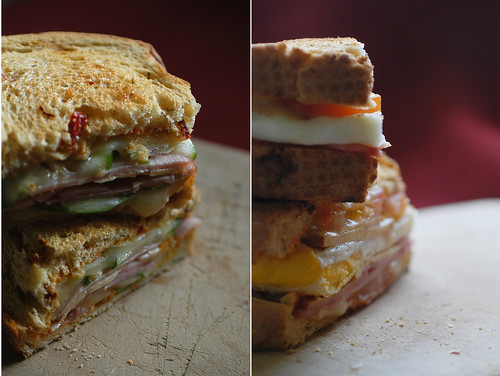
Day1: Ham, cucumber and double cheese.
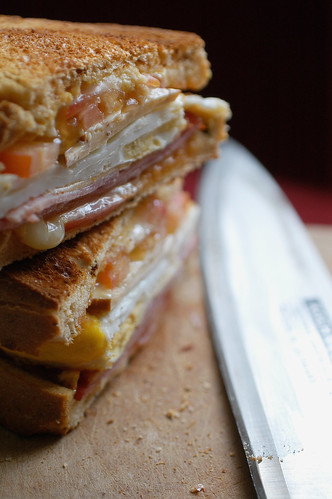
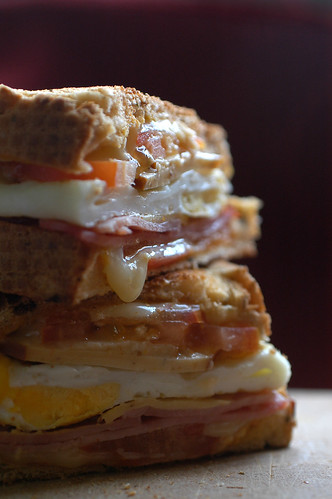 Day 2: Ham, tomato, egg and double cheese.
I don't think you would need a recipe for my sandwiches because, honestly, I didn't use one. Fact is, they don't *require* cooking, except the poached egg. But I do swear by toasting my sandwiches after assembly and before eating. One, when there's cheese, the heat would melt it and who doesn't like melted cheese?! (If you don't like melted cheese, I think there's something wrong somewhere) Two, I like my bread toasted warm and slightly crispy.Another reason for not using a recipe is just simply because you might not like mine. I like to spread mustard and sweet chilli sauce on my bread before layering on the sandwich filling. You might not like that mustard and chilli combination. I always try to have some kind of "plant material" like tomatoes, lettuce, cucumbers and/or onions in my sandwich. You might not like tomatoes. Or lettuce. Or cucumbers. Or you just don't like vegetables altogether. Which makes you like my sister and previous Biology lecturer and not very healthy.
So, it makes things easy, just focus on getting the best ingredients. I'm not one for white bread. Like white, white bread. If I had any choice, I would get bread that has something, anything, that makes it not white. And I like crusty, chewy bread. My favourite bread to go to currently is the Savoury Delight Loaf from Gardenia. But, it seems like it isn't available now. Maybe because Bonjour has one that's exactly the same, just in a different shape and not as chewy. But the addition of sun-dried tomatoes and herbs makes it really good. Even if eaten on its own.
Well, maybe you should start your own sandwich-making session now. I think I might have ran out of things to say about my sandwiches.
26 September 2007
10 September 2007
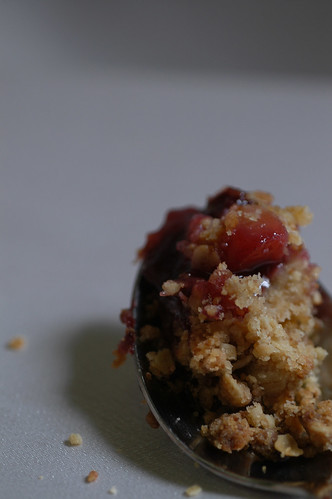
Crumbles and Crisps
Don't you love apple crumbles? Crisps, crumbles, whatever you call them. They're so easy and comforting. Somewhat like an apple pie, but not as boring.
The first time I had an apple crumble, I had it at Swensens. Probably not the best place to have my first meeting with the delightful dessert, but it was great all the same. Warm apple crumble, on a hot plate, with a scoop of vanilla ice cream. Ooh~ how I have sinned! But that was really long ago.
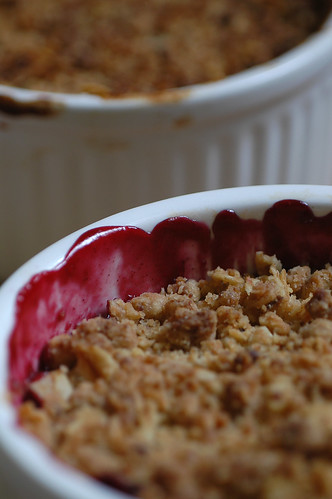
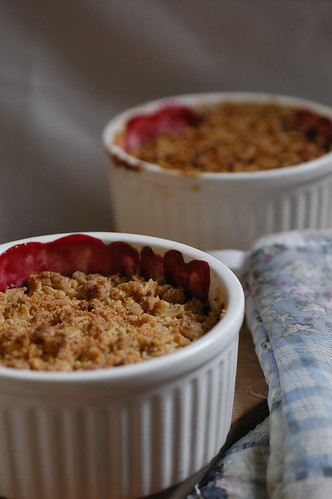
I managed to squeeze in this apple and cherry crumble before the cherry season ended, which, was also really long ago, but not quite as long as my first date with an apple crumble. I nearly wasn't going to make it until the house warming party that I went to the day before I baked served apple crumble. Now that got me started! I really do need a kick in the ass sometimes to get going. Like jogging, doing assignments, cooking, tidying up my space... well you get the idea.

I really liked how the addition of cherries give the crumble a nice ruby red hue! Doesn't it perk your appetite, that lovely colour? I didn't have fresh shredded coconut at hand and used dessicated coconut instead. I'm not quite sure if it made a difference to the texture and flavour, but hey, I love coconut and any form is greatly welcomed! I really liked the generous amount of crumble topping in each spoonful because that's my favourite part of the crumble. Well, not surprising for one who used to eat pie crust after finishing the pie filling. But I did feel that my crumble filling was a bit on the dry side and a little too sweet for my taste. But that can easily be solved by adding more lemon juice or skipping the flour for the filling and less sugar.
Haalo recommended trying the crumble in 3 ways: hot from the oven, warm and cold, which I did! And I do have to say I much prefer it hot or warm. The cold crumble wasn't, um, crumbly anymore. It was more like, um, hard. I didn't serve it with cream like Haalo because, I don't like cream and the crumble itself was enough to spoil my diet. Hee~ But if you're a cream lover, and someone who never needs to go on a diet (blah!), go ahead and have all the cream that you want!
Apple and Cherry Crumble
Ingredients
Filling
2-3 Granny Smith apples
200g cherries, pitted and halved
Juice of 1/2 a lemon
3 tbsp soft brown sugar (I would reduce this the next time)
2 tbsp palm sugar
1/4 tsp grated cinnamon
1-2 tbsp plain flour (optional)
Topping
150g plain flour
1 1/2 tsp baking powder
40g dessicated coconut
50g rolled oats
70g soft brown sugar
Zest of 1/2 a lemon
Pinch of salt
120g butter, melted
- Preheat oven to 180 deg C.
- Core and dice apples into bite-sized pieces. I suspect I cubed my apples to tiny and it didn't give the "bite" that I was looking for like in apple pies. I don't peel my apples and that didn't give my crumble any problems.
- Toss apples with all other ingredients for the filling in a large bowl and set aside in the refrigerator.
- For the topping, toss all dry ingredients in a large bowl and ensure they're evenly mixed.
- Add melted butter and incorporate into the dry ingredients with fingertips. It should turn out slightly lumpy, but not too wet. Feel free to add more flour or butter if you find that the topping is too wet or dry respectively.
- Spoon the filling into one large baking dish or individual ramekins (I used 3 small ones). Layer the topping on top of the filling. The topping layer should be quite thick. Just make more topping if you find it neccessary!
- Bake in preheated oven for 40mins if using one large ramekin or 20mins if using individual ones. The topping should be golden brown and juices bubbling underneath.
- Serve warm!
08 September 2007
Woohoo!
I can finally breathe! After 2 weeks of sleepless nights and working at wee hours of the day, I get my long deserved break. Not a total breakaway from school but at least I can relax a little.


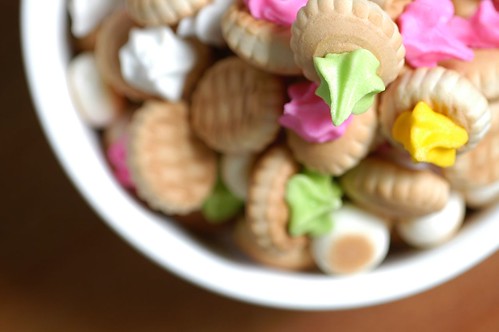
I took the photos of these moomin biscuits quite some time ago, but have yet to have the time to post time here. I admit I was attracted by their cute appearance and packaging (Mama taught me that first impressions count), but don't you think they're cute?! I bought them at Daiso, the $2-chain. Besides being cute, they do taste good, a little like regular baby biscuits. What I really like about them is that the box contained 2 small air-tight packs of biscuits, which really solves the problem of having to find an air-tight container if I couldn't finish all the biscuits at one go. But I did also realise that they don't soften as quickly as most other biscuits when left out of their packagings.
Besides eating and photographing, I did play a little with those little moomin characters... Shh~ don't tell my mum!
28 August 2007
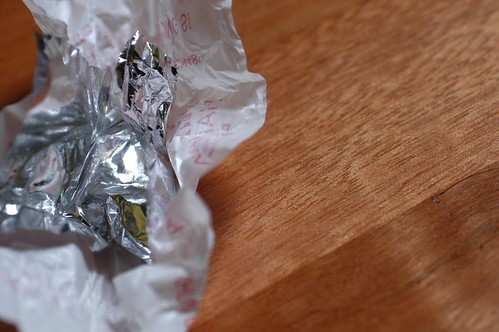
Sweeten Up
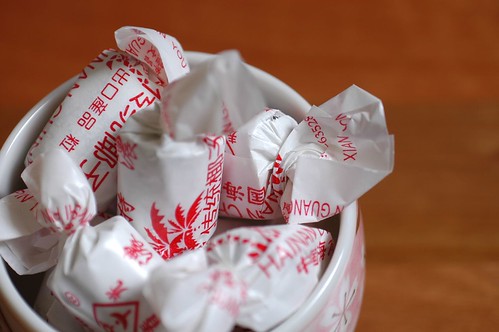
School work has been the top priority on my to-do list all these while, superseding sleep, lunch and sometimes dinner. So while I gear up to run this last leg before the term comes to a close, "enjoy" these lovely hard coconut candies that my uncle brought back from Hainan. I like these particularly because they're so flavourful, with a really distinctive taste of the coconut and a hint of charred sugar, a little like caramel. Besides, I'm one for all things pretty. The lovely red and white paper wrappers really stood out for me.
For all of you there who have been looking for updates, I think you've got to wait just a little longer! Real foodie posts coming up soon! Just not so soon. :p

13 August 2007

08 August 2007
Back to School...
And out of the kitchen. That includes the blogosphere as well. Haven't had much time to blog, let alone bake or cook something. I made this very long ago, so long ago that I can't really remember what was in it exactly. It tasted quite good though.
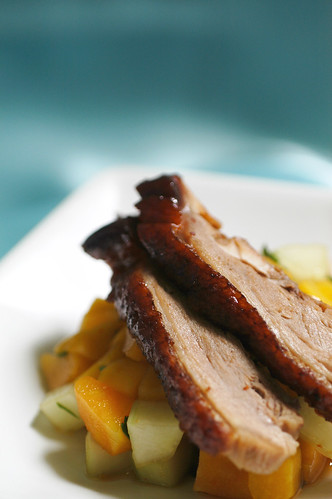
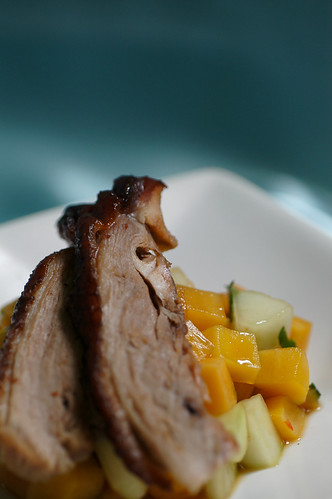
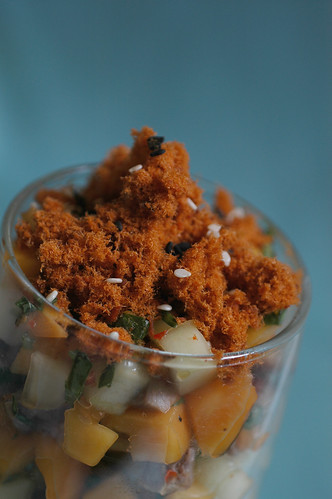
Inspired by this, I've been wanting to make some salsa with tropical fruit for quite some time. When I finally got around to really make it, I didn't have mangoes in my fridge. Nor did I have rock melon. But I had jackfruit. And cucumber. And my uncle had bought roast duck. Now, that doesn't sound too bad, does it?
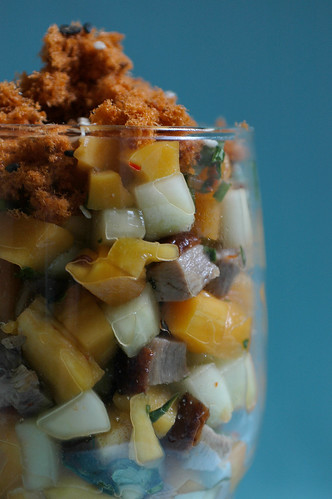
In case you haven't realised, anything sweet, sour or spicy gets my nod. Now combine it all and you've got a winner! With me, at least. So, it's no wonder why I made my salsa the way I did. You know how sometimes you really don't have an appetite because of the heat? Refreshing and light, the salsa fits summery Singapore really well. The diced cucumber lends a nice crunch to the salsa and the jackfruit, its sweetness. As in most of the recipes I post, feel free to substitute the jackfruit or just add others in! If I ever get a chance to have jackfruit, pineapple and mangoes in my fridge together, I'll definitely put them all in.
Just in case you're wondering, there's 2 different ways in which I dressed up my salsa and the roast duck. One, I placed sliced roast duck on a bed of the salsa and another, I chopped the roast duck, mixed it as part of the salsa(which maybe should be called a salad now) and topped it off with pork floss and sesame seeds. Why? Because I was simply bored. Ha.
Tropical Salsa with Roast Duck
Ingredients
3 pieces of fresh jackfruit
1/2 a cucumber
2 tbsp plum sauce
Juice of half an orange (you could use lime or lemon)
1 tbsp palm sugar
1 tsp fish sauce
1 or 2 chili padi, chopped (I used a chili paste my father made)
2 tbsp coriander, chopped
1 tbsp mint, chopped
Roast duck
Pork floss (optional)
Sesame seeds (optional)
- Remove seeds from the jackfruit and dice the flesh. Set aside in a bowl.
- Peel cucumber if desired. (I used the local ones which had blotchy skin and I didn't like that) Cut the cucumber, lengthwise, in half and then in quarters. Remove seeds, if any, and dice. Set aside in a bowl with the jackfruit.
- Mix all other ingredients, except the roast duck, together. Taste and adjust if necessary. If you use lime or lemon juice instead of orange juice, you'll probably need more sugar. And do be cautious with the chili if you can't take spicy food! Start with half a chili padi or remove the seeds.
- Mix the dressing with diced jackfruit and cucumber and set aside in the refrigerator for about 15 - 30 mins or until chilled.
- Meanwhile, place slices of roast duck on a baking tray to reheat. After which you can decide whether to (1): chop the meat up and mix with the rest of the salsa or (2): just lay them on a bed of salsa. If proceeding with (1), top the salsa with pork floss and sesame seeds.
Serves 1
Inspired by this, I've been wanting to make some salsa with tropical fruit for quite some time. When I finally got around to really make it, I didn't have mangoes in my fridge. Nor did I have rock melon. But I had jackfruit. And cucumber. And my uncle had bought roast duck. Now, that doesn't sound too bad, does it?
In case you haven't realised, anything sweet, sour or spicy gets my nod. Now combine it all and you've got a winner! With me, at least. So, it's no wonder why I made my salsa the way I did. You know how sometimes you really don't have an appetite because of the heat? Refreshing and light, the salsa fits summery Singapore really well. The diced cucumber lends a nice crunch to the salsa and the jackfruit, its sweetness. As in most of the recipes I post, feel free to substitute the jackfruit or just add others in! If I ever get a chance to have jackfruit, pineapple and mangoes in my fridge together, I'll definitely put them all in.
Just in case you're wondering, there's 2 different ways in which I dressed up my salsa and the roast duck. One, I placed sliced roast duck on a bed of the salsa and another, I chopped the roast duck, mixed it as part of the salsa(which maybe should be called a salad now) and topped it off with pork floss and sesame seeds. Why? Because I was simply bored. Ha.
Tropical Salsa with Roast Duck
Ingredients
3 pieces of fresh jackfruit
1/2 a cucumber
2 tbsp plum sauce
Juice of half an orange (you could use lime or lemon)
1 tbsp palm sugar
1 tsp fish sauce
1 or 2 chili padi, chopped (I used a chili paste my father made)
2 tbsp coriander, chopped
1 tbsp mint, chopped
Roast duck
Pork floss (optional)
Sesame seeds (optional)
- Remove seeds from the jackfruit and dice the flesh. Set aside in a bowl.
- Peel cucumber if desired. (I used the local ones which had blotchy skin and I didn't like that) Cut the cucumber, lengthwise, in half and then in quarters. Remove seeds, if any, and dice. Set aside in a bowl with the jackfruit.
- Mix all other ingredients, except the roast duck, together. Taste and adjust if necessary. If you use lime or lemon juice instead of orange juice, you'll probably need more sugar. And do be cautious with the chili if you can't take spicy food! Start with half a chili padi or remove the seeds.
- Mix the dressing with diced jackfruit and cucumber and set aside in the refrigerator for about 15 - 30 mins or until chilled.
- Meanwhile, place slices of roast duck on a baking tray to reheat. After which you can decide whether to (1): chop the meat up and mix with the rest of the salsa or (2): just lay them on a bed of salsa. If proceeding with (1), top the salsa with pork floss and sesame seeds.
Serves 1
24 July 2007
Uhh...
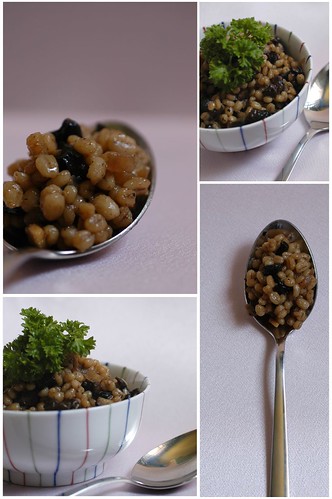
Well, yeah. It is a salad. Yet again. But this time, I'm not quite liking it. Okie, I was inspired by this when I decided to try making what I made. I've had and made barley salads before, but in a different way and my mushrooms were begging to be used and I just thought, why not? I didn't follow the reference recipe to a T, (Okie, I confess, I didn't follow it! Except for the idea of putting mushrooms, onions and barley together.) so I'm not saying I don't like what 28 cooks has done!

Here's what I did differently:
- I didn't have balsamic vinegar and I wasn't keen on substituting apple cider vinegar or black rice vinegar for it so I used terrayaki sauce. Very different, I know! But hey, terrayaki sauce is nice! With mushrooms at least.
I actually like all the individual ingredients that I've used, but put them all together and something just isn't right. I think it was too heavy, which probably was my fault, because I decided on terrayaki sauce instead of balsamic vinegar.
So why am I posting this? Well, because I took photos before tasting and decided it looked quite alright photographed and also because I'm running out of things to post about. Tee hee.
20 July 2007
La Note
Dear Evinrude/Melody/Whatever-you-call-yourself,
I've decided to run away. For months, you've put me away into that cold, cold closet of yours (I think you humans call it the refrigerator). Ever since that one time in February, you've decided to set me aside and not let me into your life again. I've been hoping that one day you would take me out of that icy dungeon and put me on that bain marie again. Melt me and stir me into whatever you're baking. But, everytime you ravage through the fridge, you only glanced so briefly at me. Each time, I harbour more hopes that you'll look at me for more than 3 seconds. But you've let me down again and again. So, I've now left you in search of greener pastures. Don't bother looking because I'm probably in someone else's cake now.
WhChoc
P.S.: Your testing pin didn't run away with me. He's in the box grater.
18 July 2007

15 July 2007
For the Child in Me
When I posted about nostalgic foods back in this post, I forgot about something. I forgot about these small little munchies I used to have as a kid. They tasted great back then, still do now, and I also know, in my head, that it's all sugar! But that doesn't stop me from reliving my childhood.

Honestly, I got quite excited when I found out that an old provision store opposite my alma mater sold these goodies! And quite cheaply too. Now, I don't think it was the taste that got me all excited and sentimental, but the way it was presented. Fact is, it was the same as before. Those square, gold-ish metal tins with a clear plastic panel on each of the 4 sides for customers to see the goods. Stacked upon one another, the biscuit tins held memories of my childhood days when I used to go shopping with my nanny at the market. Everything about that provision store was nostalgic too. The wooden carved-out signboard, tarnished metal grilled fans, old turquoise weighing scale, small plastic bucket hung from the ceiling for keeping money and, the shop owner. Hee.

Now, time to go home and work those jaws!
Thong Tat
Blk 18 Bedok South Rd
#01-69
Singapore(460018)
08 July 2007

06 July 2007
More Sandwiches!

Lunch In 4 Steps Under 10 mins
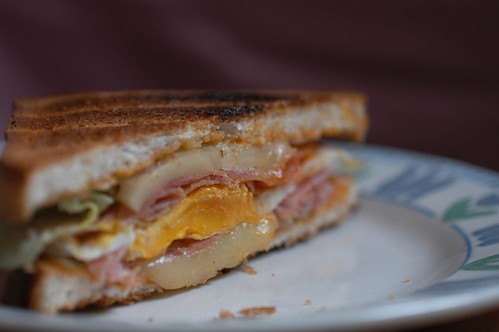
Step 1: Wash lettuce, slice cheese, fry egg, toast bread.
Step 2: Spread mustard, sweet chili sauce and mayonnaise on toasted bread.
Step 3: Layer lettuce, cheese, ham and egg on prepared bread.
Step 4: Eat!
05 July 2007
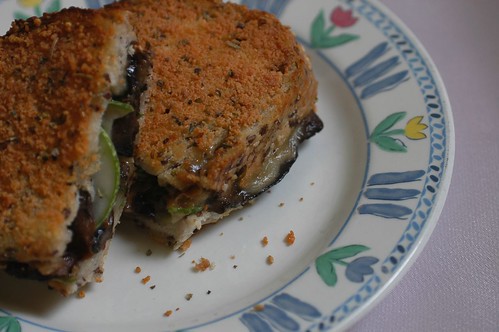
Recreating Mushroom Swiss, Without the Patty
What do you do when you run out of ideas of what to eat for lunch but desperately want to get into the kitchen to make something?
Well, I'm not sure about you, because maybe you're not the kind who suffer from kitchen-withdrawal. But I make sandwiches. Other than salads, sandwiches are the next thing that I make most often. Probably because I pack my lunch a lot. Like salads, they're really easy to make, sometimes no cooking is required, and really flexible eats. Besides the 2 slices of bread, you can put, or not, anything in between. Hell, you can even skip the slice of bread on top and make tartines or bruschetta (I don't know what's the difference between them, but I think they're just open sandwiches sort of).
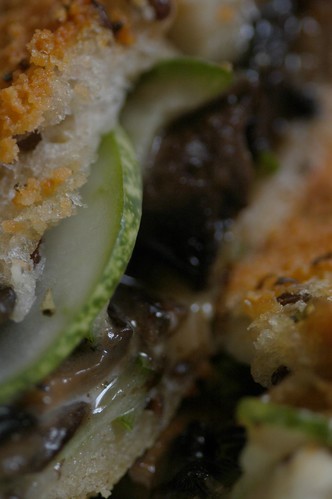
There's the usual ham and cheese, tuna mayo, egg salad sandwiches. But everybody gets tired of that sooner or later. So what can you do to spice up the humble sandwich? When I saw this over at the Homesick Texan's, I just thought I had to try it somehow! Now, I'm not a very big asparagus fan, and my mushrooms were sitting sadly in the corner of the fridge. Mushroom and cheese sandwich, a la Burger King's Mushroom Swiss (I just realised Mushroom Swiss seems to be available only in Singapore), with a crispy cheese coating. Now that's something!
Nicer-Than-Mushroom-Swiss Sandwich
Ingredients
2 slices bread (I used flaxseed loaves from the supermarket)
1/2 tbsp olive oil
1 tsp garlic, chopped
4-5 baby Portabello mushrooms, sliced thickly
1/4 tsp Italian seasoning
Salt & pepper, to taste
2-inch length cucumber, thinly sliced
Mozzarella cheese, thinly sliced
Coating
1 tbsp butter, melted
2 tbsp grated parmesan cheese
1/4 tsp Italian seasoning
- In a small frying pan, stir olive oil and garlic over medium high heat till fragrant, about 30 secs.
- Add mushrooms and saute for 3 mins.
- Season with salt, pepper and Italian herb seasoning and saute till mushrooms are tender.
- Line 1 slice of bread with half of the cucumber slices and arrange mozzarella cheese on top of the cucumber.
- Pile cooked mushrooms onto the prepared slice of bread and top with the rest of the cheese and then cucumber slices. Finish off with the second slice of bread. This way, you will have mushrooms in the very center, followed by mozzarella, then cucumbers and lastly, bread.
- Brush the top of the sandwich with melted butter and sprinkle generously with half the grated parmesan cheese and some Italian herbs. Turn the sandwich over and repeat this procedure.
- Place on a baking tray and toast in a 200 deg C oven for about 10 mins on each side until the cheese is nicely browned.
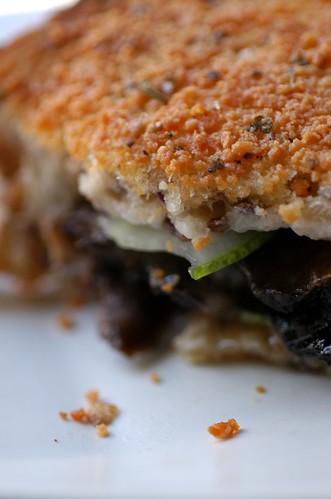
Straight out of the oven, this sandwich is sinfully delicious! The crunch of the outer coating, juicy mushrooms, melted mozzarella and refreshing cucumbers. I made mine vegetarian because meat is such a chore to prepare when you want a quick bite. That said, it is no healthy meal (obviously) with that guilt-ridden cheesy coating. I also found that the cheese for the coating can make the sandwich quite salty, so don't dredge your mushrooms with too much salt when cooking!
Well, I'm not sure about you, because maybe you're not the kind who suffer from kitchen-withdrawal. But I make sandwiches. Other than salads, sandwiches are the next thing that I make most often. Probably because I pack my lunch a lot. Like salads, they're really easy to make, sometimes no cooking is required, and really flexible eats. Besides the 2 slices of bread, you can put, or not, anything in between. Hell, you can even skip the slice of bread on top and make tartines or bruschetta (I don't know what's the difference between them, but I think they're just open sandwiches sort of).
There's the usual ham and cheese, tuna mayo, egg salad sandwiches. But everybody gets tired of that sooner or later. So what can you do to spice up the humble sandwich? When I saw this over at the Homesick Texan's, I just thought I had to try it somehow! Now, I'm not a very big asparagus fan, and my mushrooms were sitting sadly in the corner of the fridge. Mushroom and cheese sandwich, a la Burger King's Mushroom Swiss (I just realised Mushroom Swiss seems to be available only in Singapore), with a crispy cheese coating. Now that's something!
Nicer-Than-Mushroom-Swiss Sandwich
Ingredients
2 slices bread (I used flaxseed loaves from the supermarket)
1/2 tbsp olive oil
1 tsp garlic, chopped
4-5 baby Portabello mushrooms, sliced thickly
1/4 tsp Italian seasoning
Salt & pepper, to taste
2-inch length cucumber, thinly sliced
Mozzarella cheese, thinly sliced
Coating
1 tbsp butter, melted
2 tbsp grated parmesan cheese
1/4 tsp Italian seasoning
- In a small frying pan, stir olive oil and garlic over medium high heat till fragrant, about 30 secs.
- Add mushrooms and saute for 3 mins.
- Season with salt, pepper and Italian herb seasoning and saute till mushrooms are tender.
- Line 1 slice of bread with half of the cucumber slices and arrange mozzarella cheese on top of the cucumber.
- Pile cooked mushrooms onto the prepared slice of bread and top with the rest of the cheese and then cucumber slices. Finish off with the second slice of bread. This way, you will have mushrooms in the very center, followed by mozzarella, then cucumbers and lastly, bread.
- Brush the top of the sandwich with melted butter and sprinkle generously with half the grated parmesan cheese and some Italian herbs. Turn the sandwich over and repeat this procedure.
- Place on a baking tray and toast in a 200 deg C oven for about 10 mins on each side until the cheese is nicely browned.
Straight out of the oven, this sandwich is sinfully delicious! The crunch of the outer coating, juicy mushrooms, melted mozzarella and refreshing cucumbers. I made mine vegetarian because meat is such a chore to prepare when you want a quick bite. That said, it is no healthy meal (obviously) with that guilt-ridden cheesy coating. I also found that the cheese for the coating can make the sandwich quite salty, so don't dredge your mushrooms with too much salt when cooking!
29 June 2007

Subscribe to:
Posts (Atom)