28 November 2007

The Forgotten and The Not...

Have you ever forgotten a close friend's birthday? Or didn't even bothered remembering in the first place? How about forgetting your own birthday? Hrm...

Well, because I just realised my blog's birthday was 2 months ago. Not that I find it particularly important, but when Bea posted about her blog turning two, it dawned on me that I started my blog around this time last year. I checked and realised it was in October. And to be exact, 2 October. Okay okay, so my judgment's a bit off. But it's no big deal, there's always a next time!

So this post isn't just about forgotten birthdays and anniversaries. It's also about celebration! My abstract representation of cha-soba noodles actually brought me 3rd place for best capture in Click! And if I had wanted a belated birthday celebration for my blog, I think there's nothing better than a recognition of the photography I do for this blog.

Big thank you to Jai and Bee of Jugalbandi and the judges for this pleasant "birthday present". If you'd like to view the other winners, head over to Jugalbandi and take a look at the amazing entries!


Fireworks for the celebration!

20 November 2007

Click!

When I first heard about Click!, I was really kinda excited. And why wouldn't I? Photographing food that I make/eat makes up half of what I do to keep this blog and photo events just makes it more fun. Of course there's DMBLGiT but the more the merrier right?

Well I really really wanted to participate in the first edition but I was up to my neck in school work and didn't have time to photograph any eggs. Now that the holidays are here, and I'm free from school, I wouldn't miss this month's edition for anything.

Nudel. Noodles. 面.

Although I'm not a carbo freak, I do like eating noodles. Pasta, mung bean noodles, soba, udon... the list goes on. So the choices as to what to photograph were many. I have had my packet of cha-soba from Daiso for quite some time and haven't had the chance to cook it. And it came in handy for this month's contest.


I took a whole series of photographs of soba but wasn't very happy until the last few shots. Because the bundle of soba is just as such, it got quite boring lying them flat on the working surface, which was a stool with a cardboard on top (to enlarge working area), covered with a black fabric that I bought for my fashion design assignments. Even when I tried to arrange the soba unevenly, it just looked to me like a broom that we used in the kampung.

So I had seen Ilva photograph her squid ink pasta (for some reason, I can't seem to find that photograph!) and decided to use the way she composed her picture. So I stuck the bundle into a glass and let the bundle open up slightly and photograph from top down. And I liked it! I liked how it opens up like a flower or like fireworks, just not as colourful. I like going up really close and playing with DOF. So I ended up with quite an abstract shot, I must say. Which really worked for me. I wanted to go with something that doesn't say noodles outright. It might not work for everyone but hey, art is quite subjective isn't it?

Some details of the photograph
Camera: Nikon D100
Lens: Nikkor 70 - 180mm
Exposure: 0.02sec (1/50)
Aperture: f/4.5
Focal Length: 70mm
**Handheld with natural light from window 0.5m above and behind the set up.

So what if they're ugly?

I think we'd all want to think that looks don't matter, but ultimately, we all know they do. In fashion school, it's almost everything that people care about. Especially with a lecturer who can't seem to stop pointing out who's putting on weight. And when I was eating at a certain local Western food chain, I realised it just wasn't the same without a menu with pretty pictures. I need pretty pictures to tell me what to eat! But when I went to the website of that certain local Western food chain, I thought it might be for the best for the menu to not have any photographs.

So, what got me into this good looking VS bad looking talk? Well, meringues. Yeah, those that you get from baking whipped egg whites and sugar.


I had leftover egg whites from baking the lavender shortbread and decided to make some meringues out of them. I always had the impression that meringues were difficult to make so it was only then did I decide to take my first step into the realm of meringue making. And it wasn't hard. I just erm, needed to not be too hasty. I remembered seeing a recipe for meringues that Brilynn had put up and went back to look for it.

Now this is where it started going a little haywire. No, Brilynn's recipe was fine. Great actually. It was me. I swear next time I will read recipes again and again until I can memorise them before proceeding. And I swear I would never underestimate 4 egg whites. Because you see, my oven is small. Like puny, small. I never expected 4 egg whites to grow into that much meringue! And my baking sheet wouldn't fit half the piped meringues. Whipped egg whites can't sit and I was in such a haste to well, use up my egg whites that I tried speeding up the baking process by turning up the heat and forgot the last part of the recipe: leave in oven after baking for another hour. Oops.

Now after all these talk, where does the ugly part come in? Like right here. Now. So meringues obviously have to have some time in the oven at a fairly low temperature for them to bake well. And my rushing things wasn't going to give me nice meringues. The first batch browned too quickly. And didn't set. So they were kind of squishy, much less say photogenic. I had to destroy that evidence! Okay let's have the second batch then. By then I realised I wasn't going to get to use up all that meringue. To cut losses, I concentrated on that batch and did *almost* what the recipe said. But the meringues were still too brown. Amateur piping skills didn't help make my meringues any more attractive.


And guess what my sister called them. Ugly biscuits. Yeah. Thanks. And it turned out that shooting ugly biscuits made them uglier. The humidity in Singapore just wouldn't spare these poor little meringues alone. They got tacky and stuck to each other, disfiguring themselves in the process. Sigh. But! Big BUT. They were tasty. And that's what counts, right?

Because it was so long ago and I can't remember what I did to create my meringue concoction, please head down to Jumbo Empanadas and try out the meringue recipe. Even though mine didn't turn out all that great, they were slightly crisp on the outside and dissolved away in the mouth. Almost like how candy floss would. Leaving a fresh, lemony flavour lingering on the tongue. I bet yours would be better if you followed the recipe well.

Oh, and please use an electric mixer. I can't imagine you whipping the egg whites manually like my friend's boyfriend.

19 November 2007

Portrait


Portrait, originally uploaded by Ms_evinrude.

13 November 2007

Oopsie!


It's November already! And about time I posted about my lavender shortbread! I know, I know, certain few (you know who you are) have been waiting ever since I posted the photos up on Flickr a month ago. I'm really sorry! School's been busy like hell giving me no time to eat and sleep on most days much less *think* about blogging. Now that everything is finally over and I have a long break from now up to the new year, I've got lots of time to cook, blog, photograph and most of all enjoy myself. Now that's worth celebrating!


So... back to the cookies. I've previously cooked with roses and it was delightful. I love how instead of just the sense of smell, each mouthful treats you to the lovely taste and scent of rosebuds: pleasantly sweet. So when I first saw lavender cookies, I knew, somehow, that I had to get my hands on to baking them. Lavender in cookies, isn't that just plain ingenious? I've always been intrigued by cooking with flowers and cooking with lavender isn't something that I would pass on.


The first lavender cookies I encountered were these babies from Milk and Cookies. That got me itching to get some dried lavender, but as the obvious procrastinator would, I procrastinated. Then, these came. Now I really have to go get that pack of lavender!

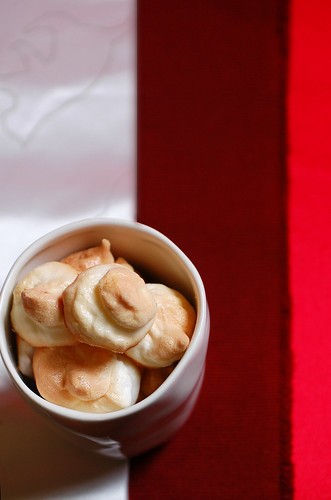
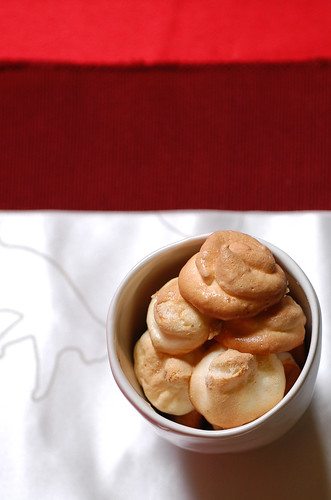
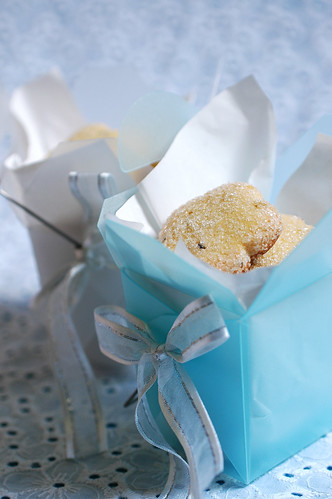
And I'm awfully glad I did. Refreshing and slightly tangy, these lavender shortbread cookies were a breath of fresh air. Sugar-coated buttery goodness. Mm~

To be honest, when I was preparing the cookie dough, I was a little apprehensive of the amount of lavender to put in. I can't really remember if I added 3/4 of a tablespoon or less, but I remember being extra hesitant about it. It was after all my first time adding lavender to food and although I wanted to be able to taste lavender in every mouthful of cookies, I didn't want to be overwhelmed by it all. When the cookie dough didn't smell or lavender at all, I started wondering if it was too little. But cookie dough(s) deceive! Once the cut cookies hit the oven, the beautiful scent of lavender filled the house. The aroma toned down once the cookies cooled, but one bite and there's no doubt about it. My sister took one cookie without any knowledge of what was in it and immediately said, "Tastes like lavender!" And everytime I open the cookie jar, I would be greeted by the smell of sweet sweet lavender. Each cookie is like a sprig of lavender flowers. So, what's not to love about these cookies?


Lavender Shortbread Cookies

Ingredients
80g icing sugar
3/4 - 1 tbsp dried lavender
140g unsalted butter, cubed
1 tsp lemon zest
210g plain flour
3 large egg yolks
Granulated sugar (for coating)

- Preheat the oven to 180°C.
- Whisk icing sugar and lavender together in a bowl.
- Add butter, lemon zest and lavender/sugar mixture to the bowl of an electric mixer and mix until smooth and light in colour.
- Add flour and mix until well combined.
- Add egg yolks and mix just until the eggs are fully incorporated and the dough comes together.
- Form a disk from the dough, wrap with plastic wrap and refrigerate until firm (about 30mins).
- Roll the dough out between 2 layers of plastic wrap to 1.5cm thickness and cut cookies out with a cookie cutter.
- Toss each cookie in a bowl of granulated sugar to coat.
- Place the sugar-coated cookies on a lined baking tray and bake till lightly golden (12 - 15mins).

P.S.: I thought the eggs I had at home were small and used 4 egg yolks instead of 3. Apparently, the were sufficiently big and I got a less crumbly texture from the cookies as the dough was moister.

P.P.S.: Handle the cookie dough as little as possible and each time after I cut enough cookies for one batch, I'll chill the remaining cookie dough again so that it's easier to work with. Also dusting the cookie cutter with flour before each cut helps to remove cookies from the cutter.


P.P.P.S: Ain't those little noodle boxes cute?! I'm working on it as a gift idea for Christmas!